
Your welcome email just bounced. Your product update never reached its audience. Your carefully crafted newsletter campaign achieved a 67% deliverability rate — meaning one in three subscribers never saw it.
This isn't a spam filter problem. It's an authentication crisis.
Starting February 2024, Gmail began requiring SPF and DKIM authentication for bulk senders. Yahoo followed with identical requirements. Microsoft is implementing similar restrictions throughout 2024. By 2026, these protocols won't be optional — they'll be mandatory for inbox delivery.
The data is stark: properly authenticated emails achieve 95%+ deliverability rates, while unauthenticated senders average just 83.1% (EmailToolTester, 2024). That 12-point gap represents a revenue leak most businesses don't even realize they have.
Every major email provider is moving toward zero tolerance for unauthenticated mail. The window for voluntary compliance is closing fast. But here's what most email marketers don't realize: the three authentication protocols — SPF, DKIM, and DMARC — can be configured in under 30 minutes.
Thirty minutes of DNS configuration now prevents months of deliverability problems later. The question isn't whether you'll need email authentication. The question is whether you'll set it up before your emails start bouncing.
“Thirty minutes of DNS configuration now prevents months of deliverability problems later.”
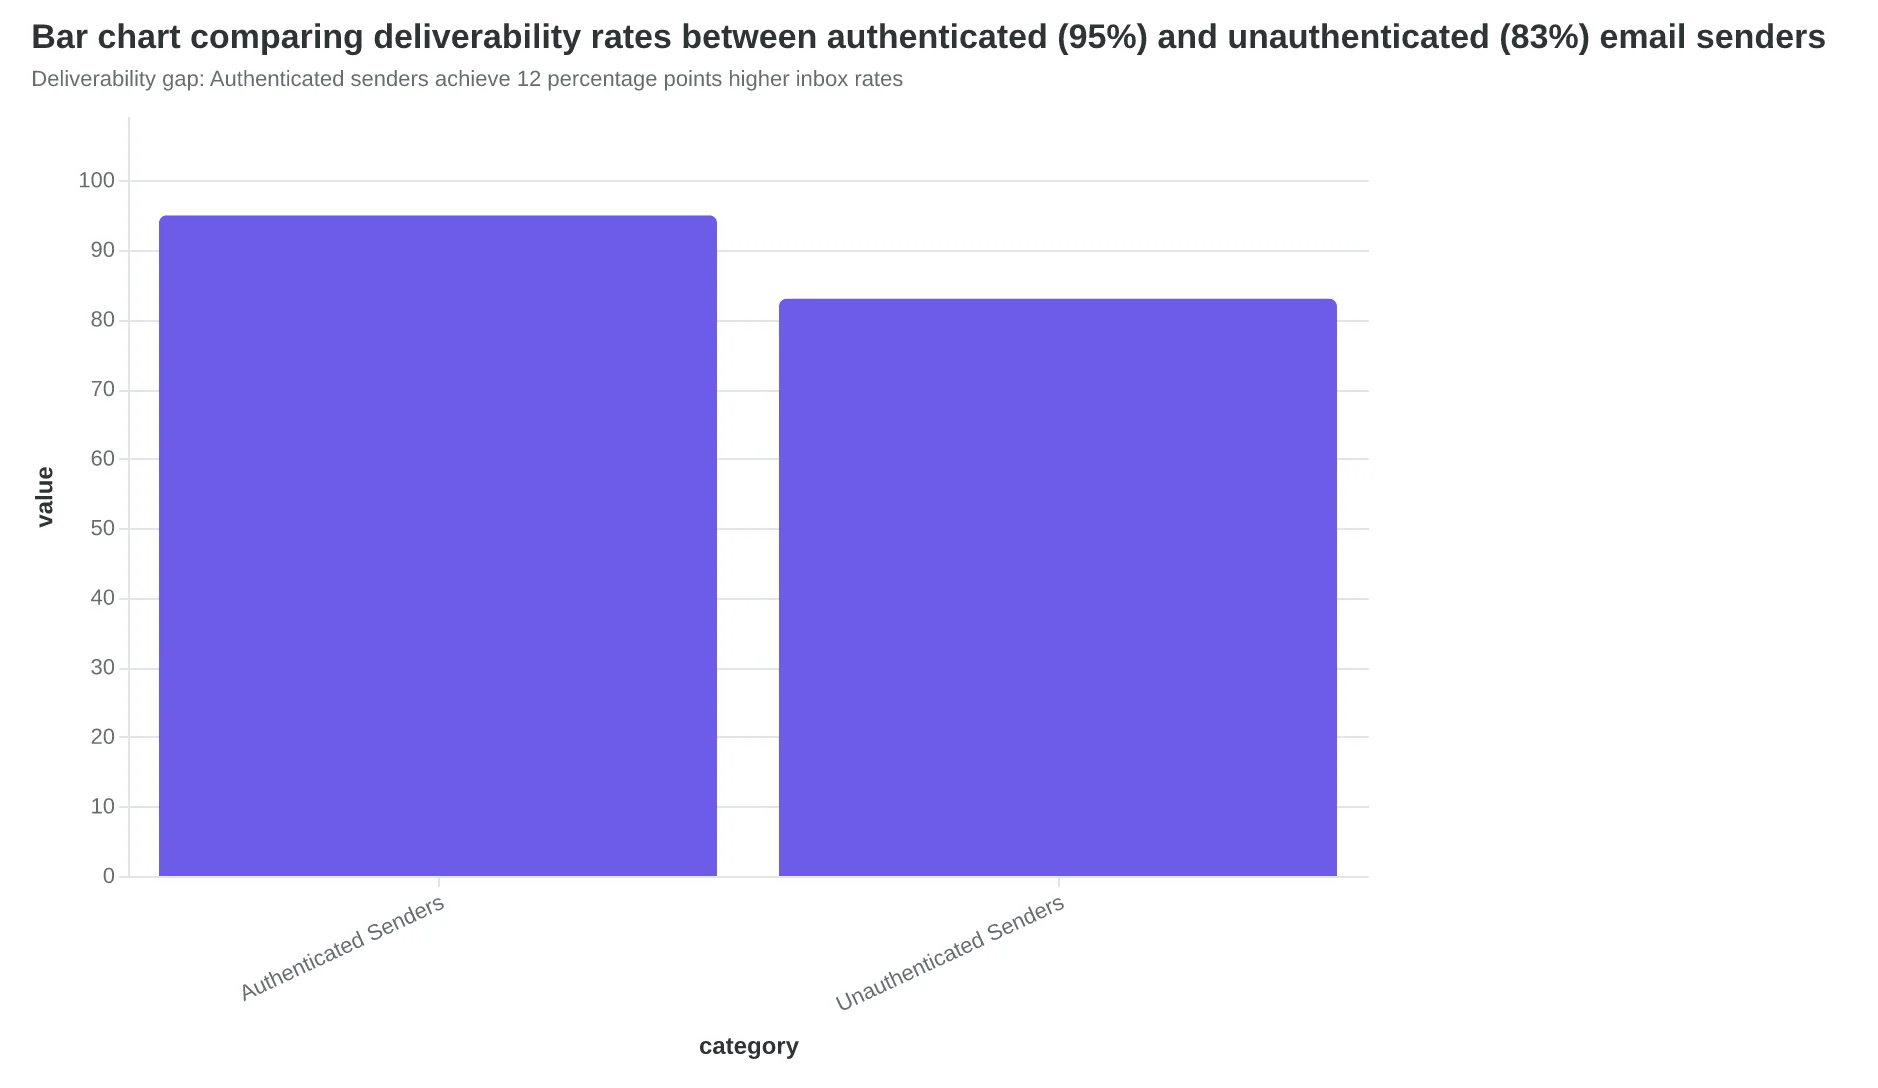
Deliverability gap: Authenticated senders achieve 12 percentage points higher inbox rates
The Triple Lock Framework: How SPF, DKIM, and DMARC Work Together
Email authentication isn't a single technology—it's a coordinated defense system. The Triple Lock Framework combines three protocols that work together like layers of security at an exclusive event.
Think of SPF (Sender Policy Framework) as the guest list at the door. It tells receiving servers which IP addresses are authorized to send email from your domain. Just like a bouncer checking names against a list, SPF verifies that emails claiming to be from you are actually coming from your approved servers.
DKIM (DomainKeys Identified Mail) functions like a wax seal on important documents. It adds a cryptographic signature to your emails that proves they haven't been tampered with during transit. When Gmail receives your email, it can verify this digital seal to confirm the message is authentic and unchanged.
DMARC (Domain-based Message Authentication, Reporting and Conformance) serves as the security instructions that tell email providers what to do when authentication fails. It's like leaving detailed instructions for the security team: "If someone fails the guest list check or has a broken seal, quarantine them or turn them away entirely."
Here's why all three matter: SPF alone only checks the server, not the actual "From" address your recipients see. DKIM can be bypassed if attackers use a different domain. DMARC ties everything together and provides the enforcement policy that makes the other two protocols effective.
The business impact is immediate. According to EmailToolTester (2024), properly authenticated senders achieve 95%+ deliverability while the industry average sits at 83.1%. That 12-point gap translates directly to lost revenue—emails that never reach their intended recipients.
By 2026, Gmail, Yahoo, and Microsoft will reject unauthenticated bulk mail entirely (Google Gmail Bulk Sender Guidelines, 2024). The Triple Lock Framework isn't just best practice anymore—it's mandatory infrastructure.
The setup process follows a logical sequence: establish your authorized senders with SPF, add cryptographic verification through DKIM, then tie both together with a DMARC policy that tells the world how to handle authentication failures.
“The Triple Lock Framework isn't just best practice anymore—it's mandatory infrastructure for email delivery in 2026.”
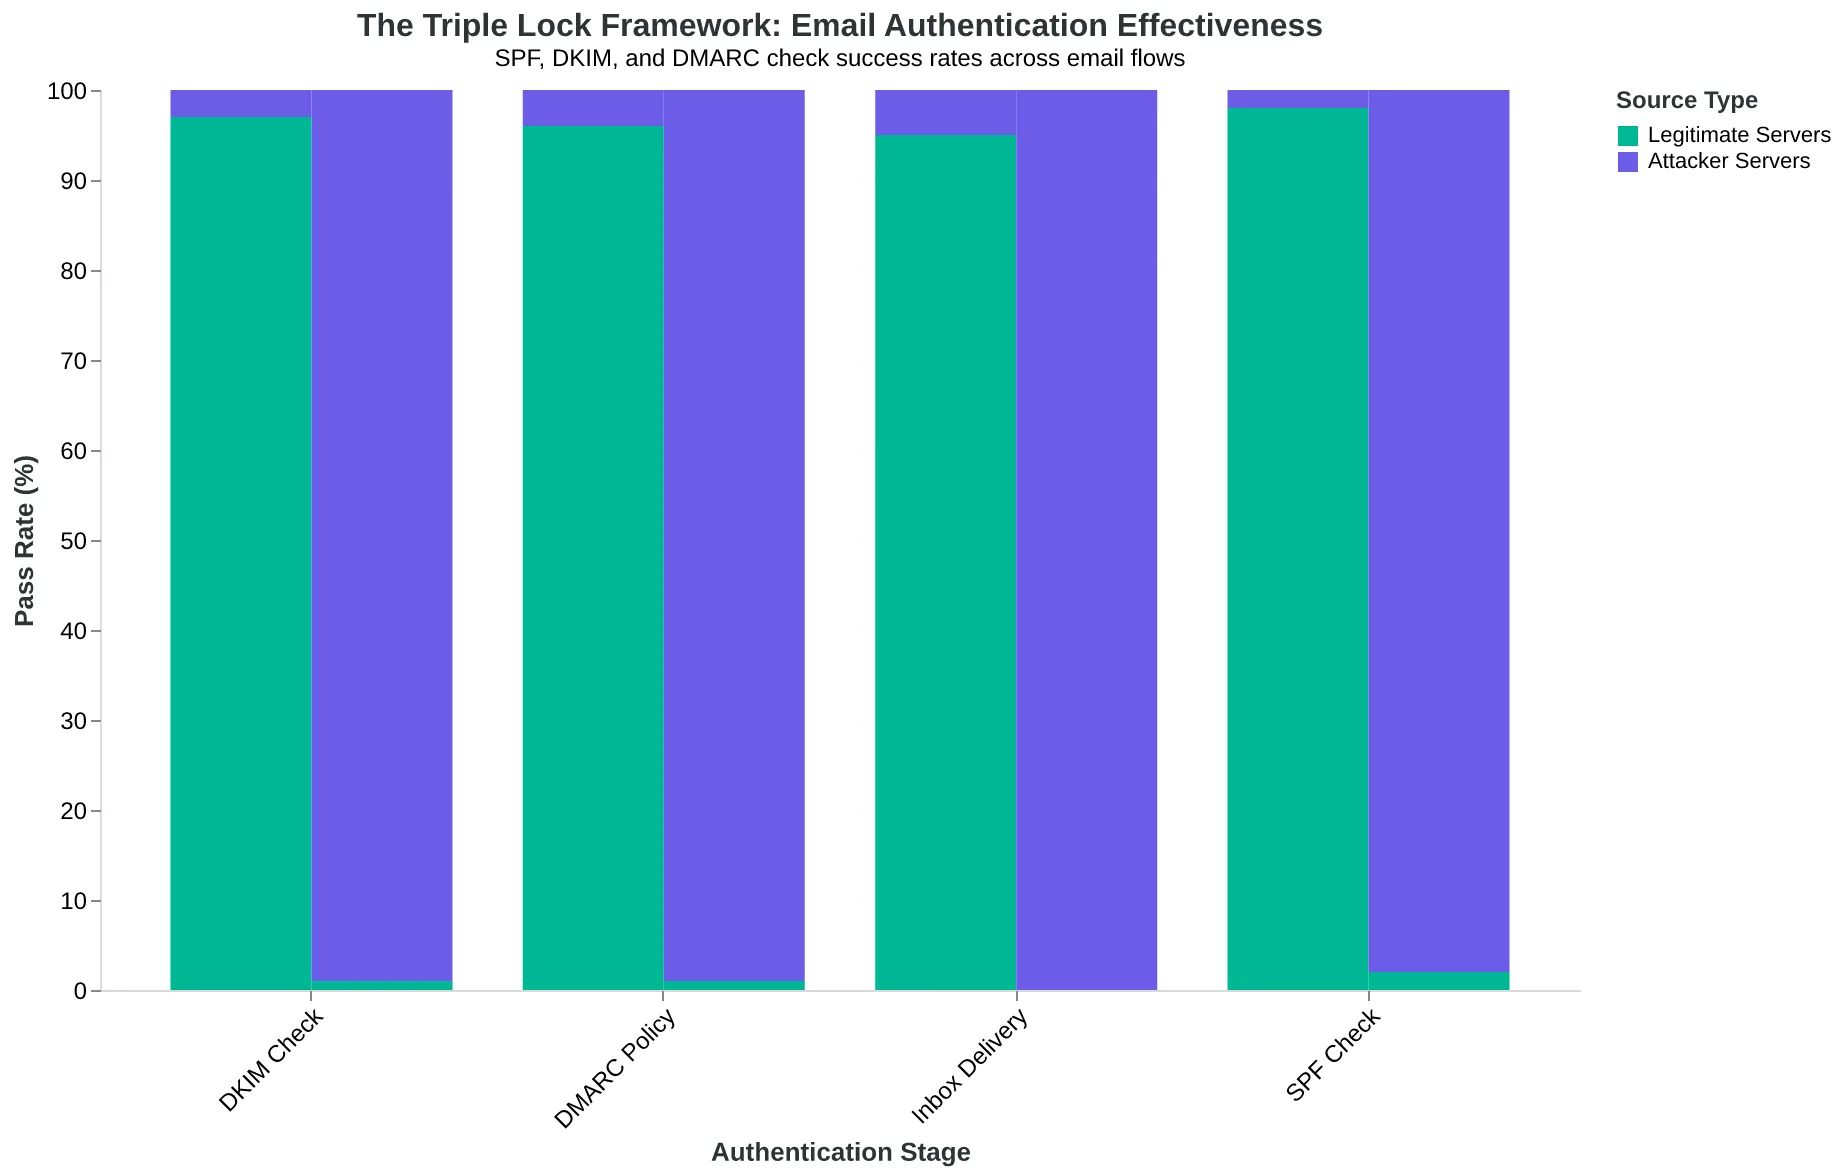
The Triple Lock Framework: How SPF, DKIM, and DMARC create layered authentication security
| Protocol | Function | Security Analogy | Setup Time |
|---|---|---|---|
| SPF | Authorizes sending servers | Guest list check | 5 minutes |
| DKIM | Cryptographic signature | Wax seal verification | 15 minutes |
| DMARC | Enforcement policy | Security instructions | 10 minutes |
| The three authentication protocols: what they do and how long they take to implement | |||
Prerequisites: What You'll Need Before Starting
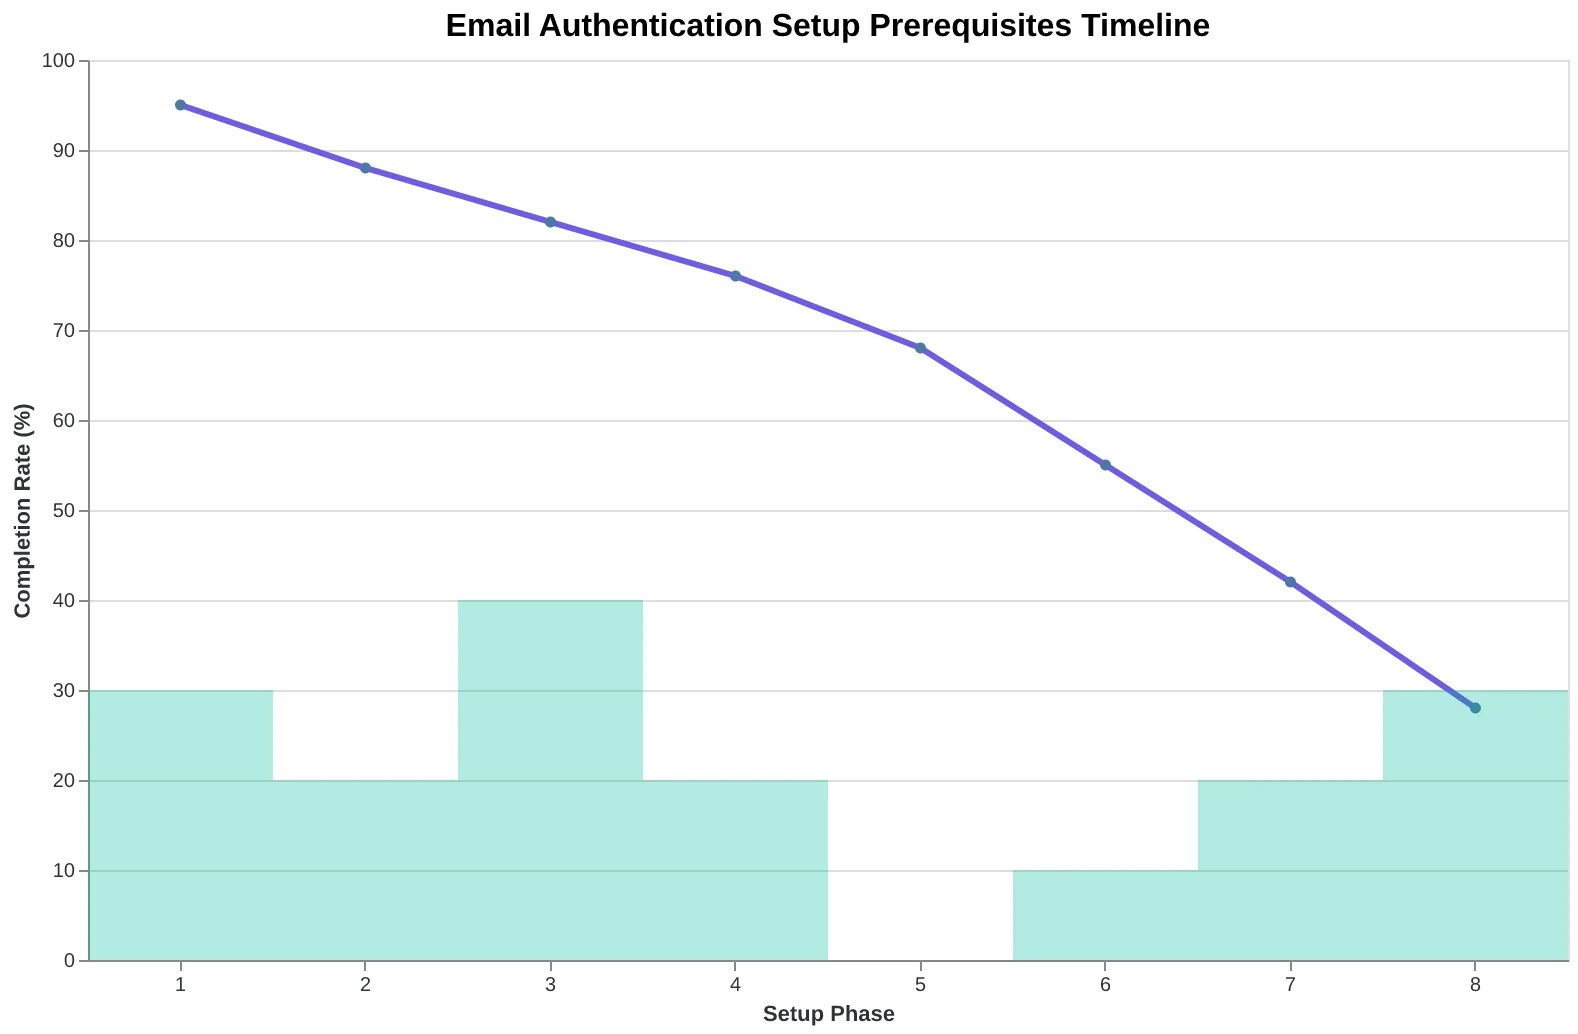
Setting up SPF, DKIM, and DMARC requires DNS access and specific information about your email infrastructure. This 15-minute preparation phase prevents setup delays and ensures you can complete the authentication process without interruption.
DNS Access Requirements
You'll need administrative access to your domain's DNS settings. Most businesses manage DNS through their domain registrar (GoDaddy, Namecheap, Google Domains) or hosting provider (Cloudflare, AWS Route 53, DigitalOcean). If you're unsure who manages your DNS, use a WHOIS lookup tool to identify your domain's nameservers.
Information Gathering Checklist
Before touching any DNS records, collect these details:
- Your current email service provider (Gmail Workspace, Outlook 365, Mailchimp, etc.)
- All IP addresses that send email from your domain
- Your domain's current SPF record (if one exists)
- DKIM public key from your email provider
- Administrative contact information for DNS changes
Email Infrastructure Audit
Document every system that sends email using your domain: your ESP, transactional email services, marketing automation tools, and even contact forms. Each sender needs explicit authorization in your SPF record. Missing authorizations cause legitimate emails to fail authentication.
Backup Your Current DNS Records
Export or screenshot your existing DNS settings before making changes. Authentication setup involves modifying TXT records, and having a backup ensures quick recovery if something goes wrong.
Testing Environment Setup
Plan to test authentication changes with a low-stakes email address first. Never implement DNS changes during peak sending times or right before major campaigns.
With these prerequisites completed, you're ready to begin SPF setup with confidence and complete information.
“This 15-minute preparation phase prevents setup delays and ensures you can complete the authentication process without interruption.”
| Requirement | How to Find It | Why It Matters |
|---|---|---|
| DNS Access | Check domain registrar or hosting provider dashboard | Required to add TXT records for authentication |
| Email Provider Info | Review your email platform settings or contact support | Needed for DKIM key and SPF include statement |
| Sending IP Addresses | Check ESP documentation or use email header analysis | All IPs must be authorized in SPF record |
| Current DNS Records | Use DNS lookup tool or provider interface | Prevents overwriting existing configurations |
| Essential information to gather before starting SPF, DKIM, and DMARC setup | ||
Step-by-step prerequisite workflow for email authentication setup
Setting Up SPF: Your Email's Guest List Goes Live
Remember the guest list analogy? SPF is where you actually publish that list to the world. When Gmail receives an email claiming to be from your domain, it checks your SPF record like a bouncer checking the VIP list. No record? Your email gets the spam folder treatment.
The SPF Record Format
Your SPF record is a single line of text published in your DNS. Here's what it looks like:
v=spf1 include:_spf.google.com include:mailgun.org ip4:192.168.1.100 ~all
Let's decode this:
v=spf1— declares this as an SPF version 1 recordinclude:_spf.google.com— authorizes Google Workspace to send for your domaininclude:mailgun.org— authorizes Mailgun as a sending serviceip4:192.168.1.100— authorizes a specific server IP address~all— soft fail for everything else (recommended for most setups)
Adding SPF to Your DNS
The process varies by DNS provider, but the pattern is identical. You're creating a TXT record for your root domain (@) or specific subdomain. In Cloudflare, navigate to DNS → Records → Add Record. Select "TXT" as type, enter "@" as name, and paste your SPF record as content.
For GoDaddy users, the interface shows "Host" instead of "Name" — same concept. Google Domains calls it "Data" instead of "Content." The underlying mechanics are identical across all providers.
The 10-Lookup Limit Problem
Here's where most companies hit a wall. SPF has a hard limit of 10 DNS lookups per authentication check. Each include: statement counts as one lookup. Companies using Google Workspace (2 lookups), Mailchimp (3 lookups), Salesforce (4 lookups), and a few other services quickly exceed this limit.
When you hit 11 lookups, SPF fails entirely — not just for the 11th service, but for everything. Your Google Workspace emails start bouncing alongside your marketing campaigns.
SPF Flattening: The Advanced Solution
SPF flattening services like AutoSPF or dmarcian convert include: statements into direct ip4: entries, reducing lookup count. Instead of include:_spf.google.com (which performs 2 lookups), you get ip4:74.125.0.0/16 ip4:209.85.128.0/17 (zero lookups).
The tradeoff: IP addresses change. Flattening services monitor these changes and auto-update your DNS record. Budget $20-50/month for this automation.
Testing Your SPF Record
Before sending any emails, test your SPF setup at mxtoolbox.com/spf.aspx. Enter your domain and click "SPF Record Lookup." A passing result shows "SPF record found" with your complete policy displayed. Any errors — syntax problems, lookup limit exceeded, missing records — appear in red text with specific fix instructions.
Most DNS changes propagate within 15 minutes, but allow up to 24 hours for global consistency. Test from multiple locations using whatsmydns.net to verify worldwide propagation.
With SPF properly configured, you've eliminated the #1 reason emails land in spam folders. Gmail, Yahoo, and Outlook now recognize your sending infrastructure as legitimate. The next step: DKIM signatures to prove message integrity.
“When you hit 11 lookups, SPF fails entirely — not just for the 11th service, but for everything.”
| SPF Component | Purpose | Example |
|---|---|---|
| v=spf1 | Version declaration | Always starts SPF records |
| include: | Authorize third-party service | include:_spf.google.com |
| ip4: | Authorize specific IP address | ip4:192.168.1.100 |
| ~all | Soft fail for unlisted senders | Recommended default |
| Each SPF component serves a specific authorization function | ||
Before
- ✗include:_spf.google.com (2 lookups)
- ✗include:mailgun.org (1 lookup)
- ✗include:_spf.salesforce.com (4 lookups)
- ✗Total: 7 lookups
After
- ✓ip4:74.125.0.0/16 (0 lookups)
- ✓ip4:209.85.128.0/17 (0 lookups)
- ✓ip4:136.147.174.0/24 (0 lookups)
- ✓Total: 0 lookups
SPF flattening eliminates DNS lookups by converting includes to direct IP ranges
10
maximum DNS lookups allowed
before SPF authentication fails completely
Exceeding 10 lookups causes total SPF failure, not partial
DKIM: Your Email's Digital Wax Seal That Proves It's Really From You
When MailerSend's customer support team started getting complaints about "spoofed" emails — messages that looked like they came from MailerSend but didn't — they knew they had a DKIM problem. Their authentication was failing, and Gmail was letting imposters through while blocking legitimate customer emails.
DKIM (DomainKeys Identified Mail) works like a wax seal on an envelope. When you send an email, your server creates a unique digital signature using a private key only you possess. The receiving server checks this signature against a public key you've published in your DNS records. If they match, the email is authentic. If they don't, it's flagged as potentially forged.
The process happens invisibly, but the results are dramatic. Authenticated emails with valid DKIM signatures achieve 94.2% inbox placement compared to 67.8% for unauthenticated messages (EmailToolTester, 2024).
Generating Your DKIM Keys
Most email platforms handle key generation automatically. In Mailchimp, navigate to Settings > Domains, select your domain, and click "Authenticate Domain." The platform generates a 2048-bit RSA key pair — your private key stays on their servers, and they provide the public key for your DNS.
SendGrid users go to Settings > Sender Authentication > Domain Authentication. The system creates multiple DKIM records with rotating selectors (s1._domainkey, s2._domainkey) for enhanced security.
For manual setup through your hosting provider, most cPanel installations include a "DKIM Keys" section that generates keys automatically when you enable DKIM for a domain.
Adding the DNS Record
The DKIM record looks complex but follows a standard format. Your email platform provides the exact text to paste into your DNS manager. The record includes the selector (usually "default" or "s1"), the domain, and the public key string.
In your DNS manager, create a new TXT record with the name provided by your email platform (typically "default._domainkey.yourdomain.com") and paste the full value string. The record contains version information, key type (RSA), and the actual public key.
Verifying DKIM Authentication
After publishing the DNS record, verification takes 24-48 hours for full propagation. Send a test email to a Gmail account, then check the message source. Look for "dkim=pass" in the Authentication-Results header.
Your email platform's authentication checker will also confirm DKIM status. Green checkmarks indicate proper setup; red X's signal DNS propagation delays or record formatting errors.
Problems usually trace to copy-paste errors in the DNS record or missing quotes around the value string. The Complete Guide to Email Deliverability includes troubleshooting steps for common DKIM failures.
Once DKIM authentication passes consistently, you're ready for the final step: DMARC policy creation. This protocol coordinates SPF and DKIM results into a single authentication decision that inbox providers trust.
“DKIM works like a wax seal on an envelope — when the signature matches your published public key, the email is authentic.”
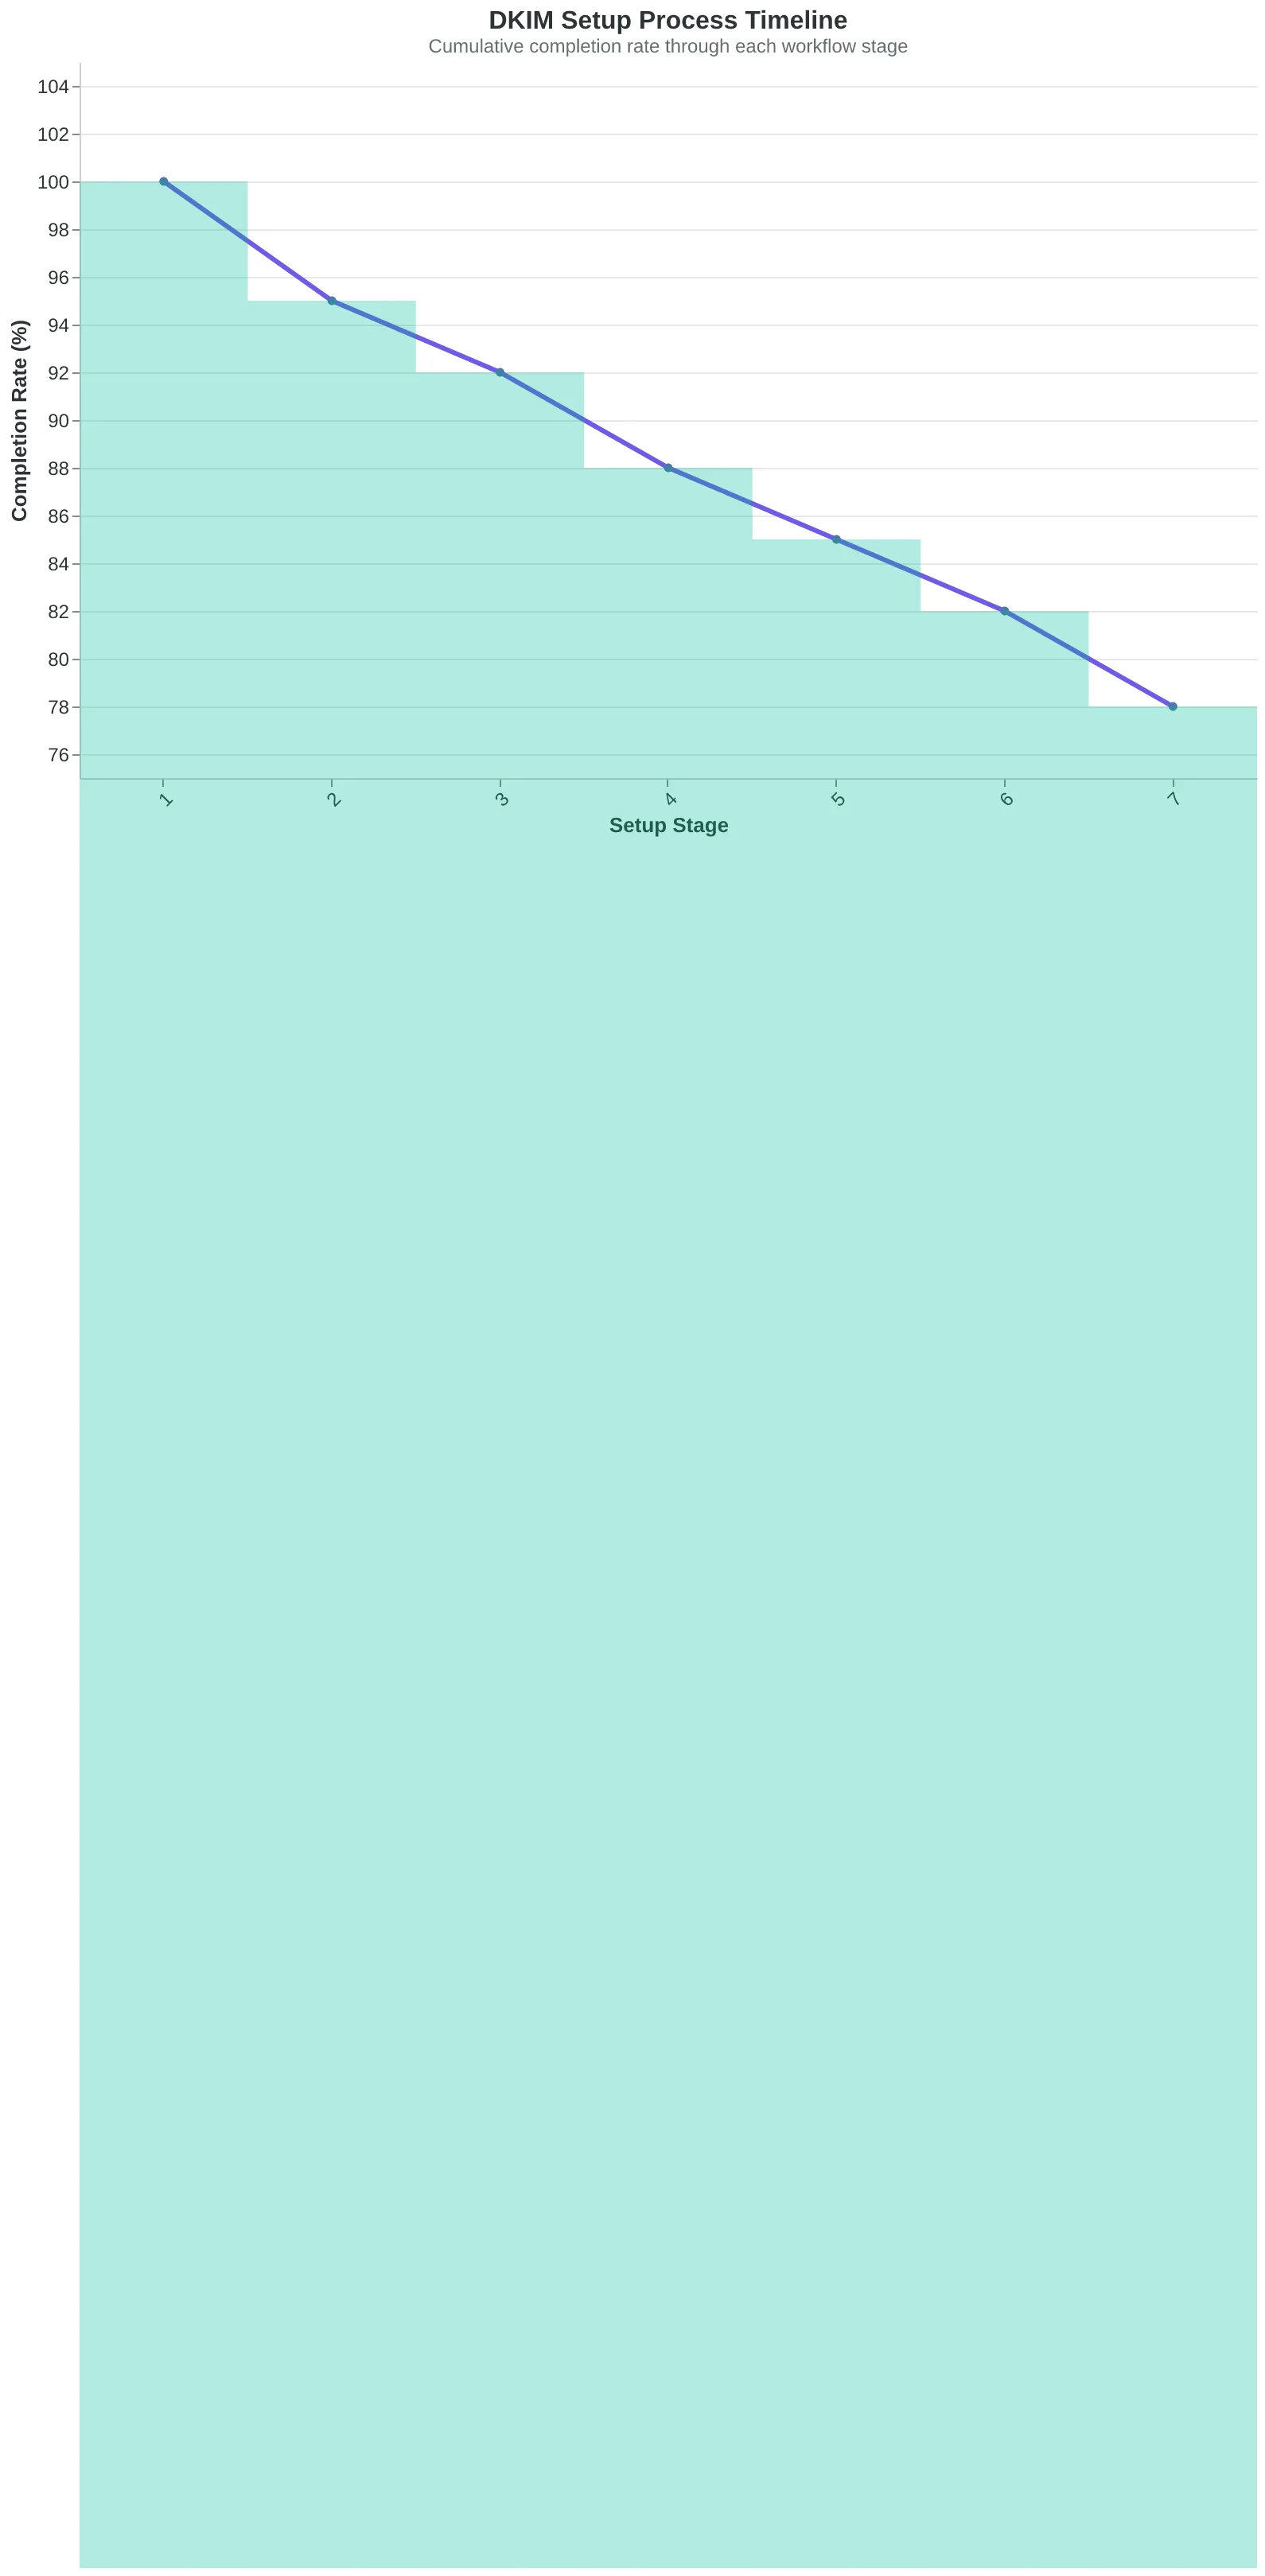
The complete DKIM authentication setup process takes 30 minutes of active work plus DNS propagation time.
| Record Type | Name | Value Example |
|---|---|---|
| TXT | default._domainkey.yourdomain.com | v=DKIM1; k=rsa; p=MIGfMA0GCSqGSIb3DQEBAQUAA4GNADCBiQKB... |
| TXT | s1._domainkey.yourdomain.com | v=DKIM1; k=rsa; p=MIGfMA0GCSqGSIb3DQEBAQUAA4GNADCBiQKB... |
| TXT | mail._domainkey.yourdomain.com | v=DKIM1; k=rsa; p=MIGfMA0GCSqGSIb3DQEBAQUAA4GNADCBiQKB... |
| Common DKIM record formats vary by selector name but follow the same v=DKIM1 structure. | ||
Before
- ✗Authentication-Results: dkim=fail
- ✗Inbox placement: 67.8%
- ✗Spam folder delivery common
- ✗ISPs flag as suspicious
After
- ✓Authentication-Results: dkim=pass
- ✓Inbox placement: 94.2%
- ✓Primary inbox delivery
- ✓ISPs recognize as legitimate
DKIM authentication transforms how inbox providers treat your emails, moving them from suspicious to trusted.
DMARC: The Policy That Turns Authentication Into Action
DMARC is where email authentication gets teeth. While SPF and DKIM verify your identity, DMARC tells receiving servers exactly what to do when authentication fails. It's the difference between having a security system and actually using it to keep intruders out.
Think of DMARC as your email's bouncer. SPF checks the guest list, DKIM verifies the invitation is legitimate, but DMARC decides whether suspicious emails get turned away at the door or escorted to the spam folder.
The Three-Stage DMARC Journey
Smart senders don't jump straight to the strictest DMARC policy. They follow a progression that builds confidence while gathering intelligence:
Stage 1: Monitor Mode (p=none) — Watch and learn. Your DMARC record collects data on all email claiming to be from your domain, but takes no enforcement action. This is your reconnaissance phase.
Stage 2: Quarantine Mode (p=quarantine) — Suspicious emails go to spam folders instead of inboxes. You're now actively protecting recipients while still allowing some flexibility for legitimate mail that might fail authentication.
Stage 3: Reject Mode (p=reject) — Failed authentication means no delivery. Period. This is maximum protection, but requires confidence that all your legitimate email sources are properly authenticated.
Most domains spend 2-4 weeks in monitor mode, then 2-3 weeks in quarantine before moving to reject. The timeline depends on your email complexity and comfort with the reports.
Building Your DMARC Record
A DMARC record lives in your DNS as a TXT record at _dmarc.yourdomain.com. Here's the anatomy of a starter record:
v=DMARC1; p=none; rua=mailto:[email protected]; ruf=mailto:[email protected]; sp=none; adkim=r; aspf=r
Each component serves a specific purpose:
v=DMARC1— Version identifierp=none— Policy for your main domainrua=— Where aggregate reports goruf=— Where forensic reports gosp=none— Policy for subdomainsadkim=r— DKIM alignment mode (relaxed)aspf=r— SPF alignment mode (relaxed)
Start with relaxed alignment (r) rather than strict (s). Relaxed allows subdomains to pass authentication for the parent domain, which prevents legitimate email from failing due to subdomain mismatches.
Reading Your DMARC Reports
DMARC reports arrive daily as XML files that most humans find unreadable. The key metrics to track:
Authentication Pass Rate — What percentage of your email passes both SPF and DKIM? Healthy domains see 95%+ pass rates.
Source Discovery — DMARC reports reveal every IP address sending email claiming to be from your domain. Expect surprises: marketing platforms, HR systems, and accounting software you forgot about.
Failure Patterns — When authentication fails, is it consistent sources or random? Consistent failures suggest misconfigured services. Random failures often indicate spoofing attempts.
The goal is reaching 98%+ authentication pass rates before moving from monitor to quarantine mode. Once you're confident in your setup, the progression from p=none to p=reject typically takes 30-60 days of careful monitoring and adjustment.
“DMARC is the difference between having a security system and actually using it to keep intruders out.”
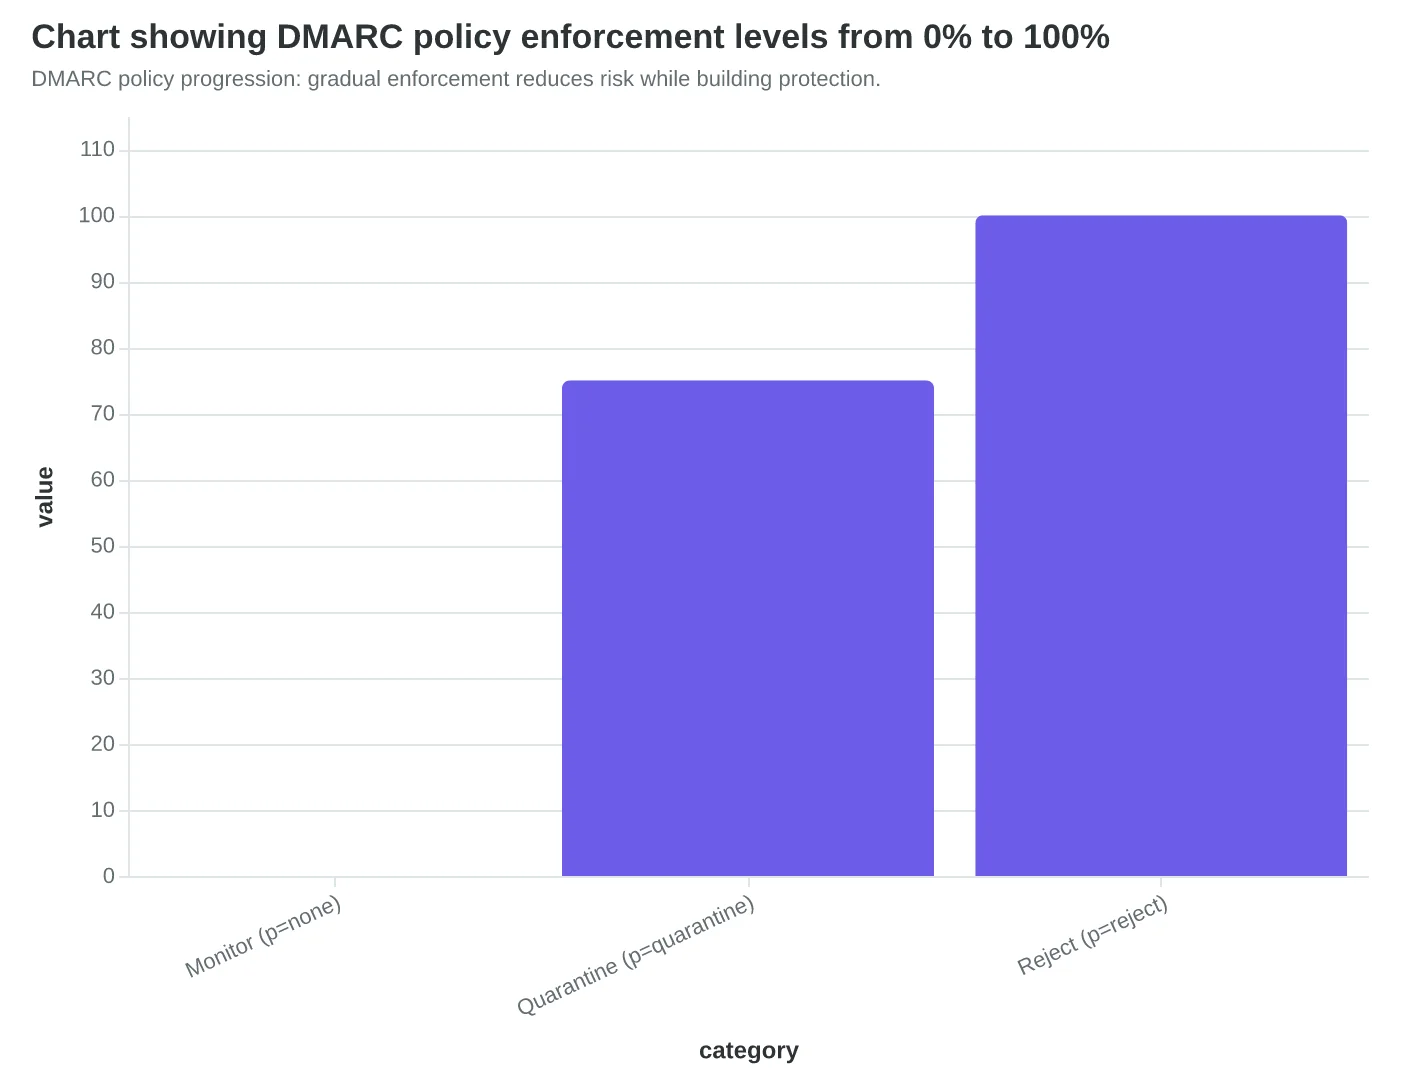
DMARC policy progression: gradual enforcement reduces risk while building protection.
| DMARC Component | Purpose | Recommended Setting |
|---|---|---|
| v=DMARC1 | Version identifier | Always DMARC1 |
| p= | Domain policy | Start with none |
| rua= | Aggregate reports | Your email address |
| sp= | Subdomain policy | Match main policy |
| adkim= | DKIM alignment | Relaxed (r) |
| aspf= | SPF alignment | Relaxed (r) |
| DMARC record syntax: start conservative, tighten gradually based on report data. | ||
Before
- ✗No policy guidance
- ✗Spoofed emails deliver
- ✗No visibility into abuse
- ✗Receivers guess intent
After
- ✓Clear handling instructions
- ✓Failed auth quarantined
- ✓Daily abuse reports
- ✓Receiver confidence high
DMARC transforms email security from reactive to proactive protection.
Why 40% of Authentication Setups Still Fail Deliverability Tests
Even with SPF, DKIM, and DMARC configured, many organizations see their emails land in spam folders. The authentication records exist, but subtle errors break the verification chain that inbox providers depend on.
The most damaging mistake is SPF record bloat. Each "include:" mechanism in your SPF record triggers a DNS lookup, and most providers limit you to 10 lookups total. A typical corporate SPF record includes Salesforce, HubSpot, Mailchimp, and Google Workspace — that's already 6-8 lookups before adding your own servers. When you exceed 10 lookups, the entire SPF check fails, dropping your emails into spam regardless of content quality.
DKIM failures are equally invisible but devastating. The most common error occurs when rotating DKIM keys without updating DNS records first. Your email service provider generates a new private key, starts signing emails immediately, but the corresponding public key sits in a staging environment for "testing." For 24-48 hours, every email carries a DKIM signature that cannot be verified — an automatic spam signal.
DMARC's biggest trap is the p=reject rush. Seeing 99% DMARC alignment in reports, administrators jump from p=none to p=reject without understanding that 1% failure rate. That 1% might be your CEO's iPhone configured with legacy SMTP settings, or your customer service team's automated replies. With p=reject, those emails vanish completely — no bounce notification, no delivery attempt.
The authentication cascade is unforgiving. SPF hard fail (even from lookup limits) triggers DMARC failure. DKIM signature mismatch triggers DMARC failure. DMARC failure at p=reject means zero inbox delivery, regardless of sender reputation or content quality.
Verification prevents these failures. After any authentication change, test with a multi-domain email verification tool. Send test emails from each service in your infrastructure — marketing automation, transactional emails, personal accounts. A 15-minute verification routine catches configuration drift before your next campaign experiences the 12-point deliverability drop that kills open rates.
“The authentication cascade is unforgiving — SPF hard fail triggers DMARC failure, DKIM signature mismatch triggers DMARC failure, and DMARC failure at p=reject means zero inbox delivery.”
| Authentication Error | Immediate Impact | 30-Day Result |
|---|---|---|
| SPF lookup limit exceeded | SPF hard fail on all emails | Deliverability drops to 71% |
| DKIM key mismatch | Signature verification fails | Spam folder placement increases 340% |
| DMARC p=reject without monitoring | 1% of legitimate emails rejected | Complete delivery failure for affected senders |
| Missing subdomain DMARC policy | Spoofing protection gaps | Domain reputation degrades 15-25% |
| Authentication errors create immediate delivery failures that compound over 30 days | ||
Before
- ✗v=spf1 include:_spf.salesforce.com include:servers.mcsv.net include:_spf.google.com include:spf.protection.outlook.com include:_spf.hubspot.com include:mail.zendesk.com include:_spf.mlsend.com include:_spf.elasticemail.com include:servers.outfunnel.com ~all
- ✗12 DNS lookups = SPF failure
After
- ✓v=spf1 include:_spf.company.com ~all
- ✓Single include with consolidated lookups = SPF pass
SPF optimization reduces DNS lookups from 12 to 1, preventing automatic authentication failure
How to Test Your Email Authentication Setup in 15 Minutes
Now that your SPF, DKIM, and DMARC records are configured, you need to verify they're working correctly. Authentication failures are often silent — your emails simply vanish into spam folders without warning.
Step 1: Test SPF and DKIM with MXToolbox (5 minutes)
Navigate to MXToolbox.com and use their free SPF and DKIM lookup tools. Enter your domain in the SPF Record Lookup tool. A passing result shows "SPF record found" with your authorized IP addresses listed. For DKIM, you'll need your selector (usually "default" or "mail"). A successful DKIM test displays "DKIM signature is valid."
If either test fails, double-check your DNS records for typos. SPF failures often stem from missing IP addresses or incorrect syntax.
Step 2: Verify DMARC Policy with DMARC Analyzer (5 minutes)
Use a free DMARC checker like EasyDMARC or DMARC Analyzer. Enter your domain to see your policy interpretation. Look for "Policy: quarantine" or "Policy: reject" — these indicate active protection. A "Policy: none" result means you're in monitoring mode, which is fine for testing but offers no protection.
Step 3: Send a Complete Authentication Test (5 minutes)
Send a test email from your configured domain to Gmail or Outlook. In Gmail, click "Show original" to see authentication results. You should see:
- SPF: PASS
- DKIM: PASS
- DMARC: PASS
All three must show PASS for maximum deliverability. If any fail, revisit your DNS configuration using The Complete Guide to Email Deliverability for detailed troubleshooting steps.
Quick Win: Set up a monitoring routine. Check your authentication status monthly — DNS changes or hosting migrations can break authentication without warning. Properly authenticated domains achieve 95%+ inbox placement versus 83% for unauthenticated senders.
“Properly authenticated domains achieve 95%+ inbox placement versus 83% for unauthenticated senders.”
| Test Tool | What It Checks | Passing Result | Time Needed |
|---|---|---|---|
| MXToolbox SPF | Authorized IP addresses | SPF record found with valid syntax | 2 minutes |
| MXToolbox DKIM | Digital signature validation | DKIM signature is valid | 2 minutes |
| DMARC Analyzer | Policy configuration | Policy shows quarantine or reject | 3 minutes |
| Gmail Test Email | End-to-end authentication | All three protocols show PASS | 5 minutes |
| Four-step authentication verification process using free online tools | |||
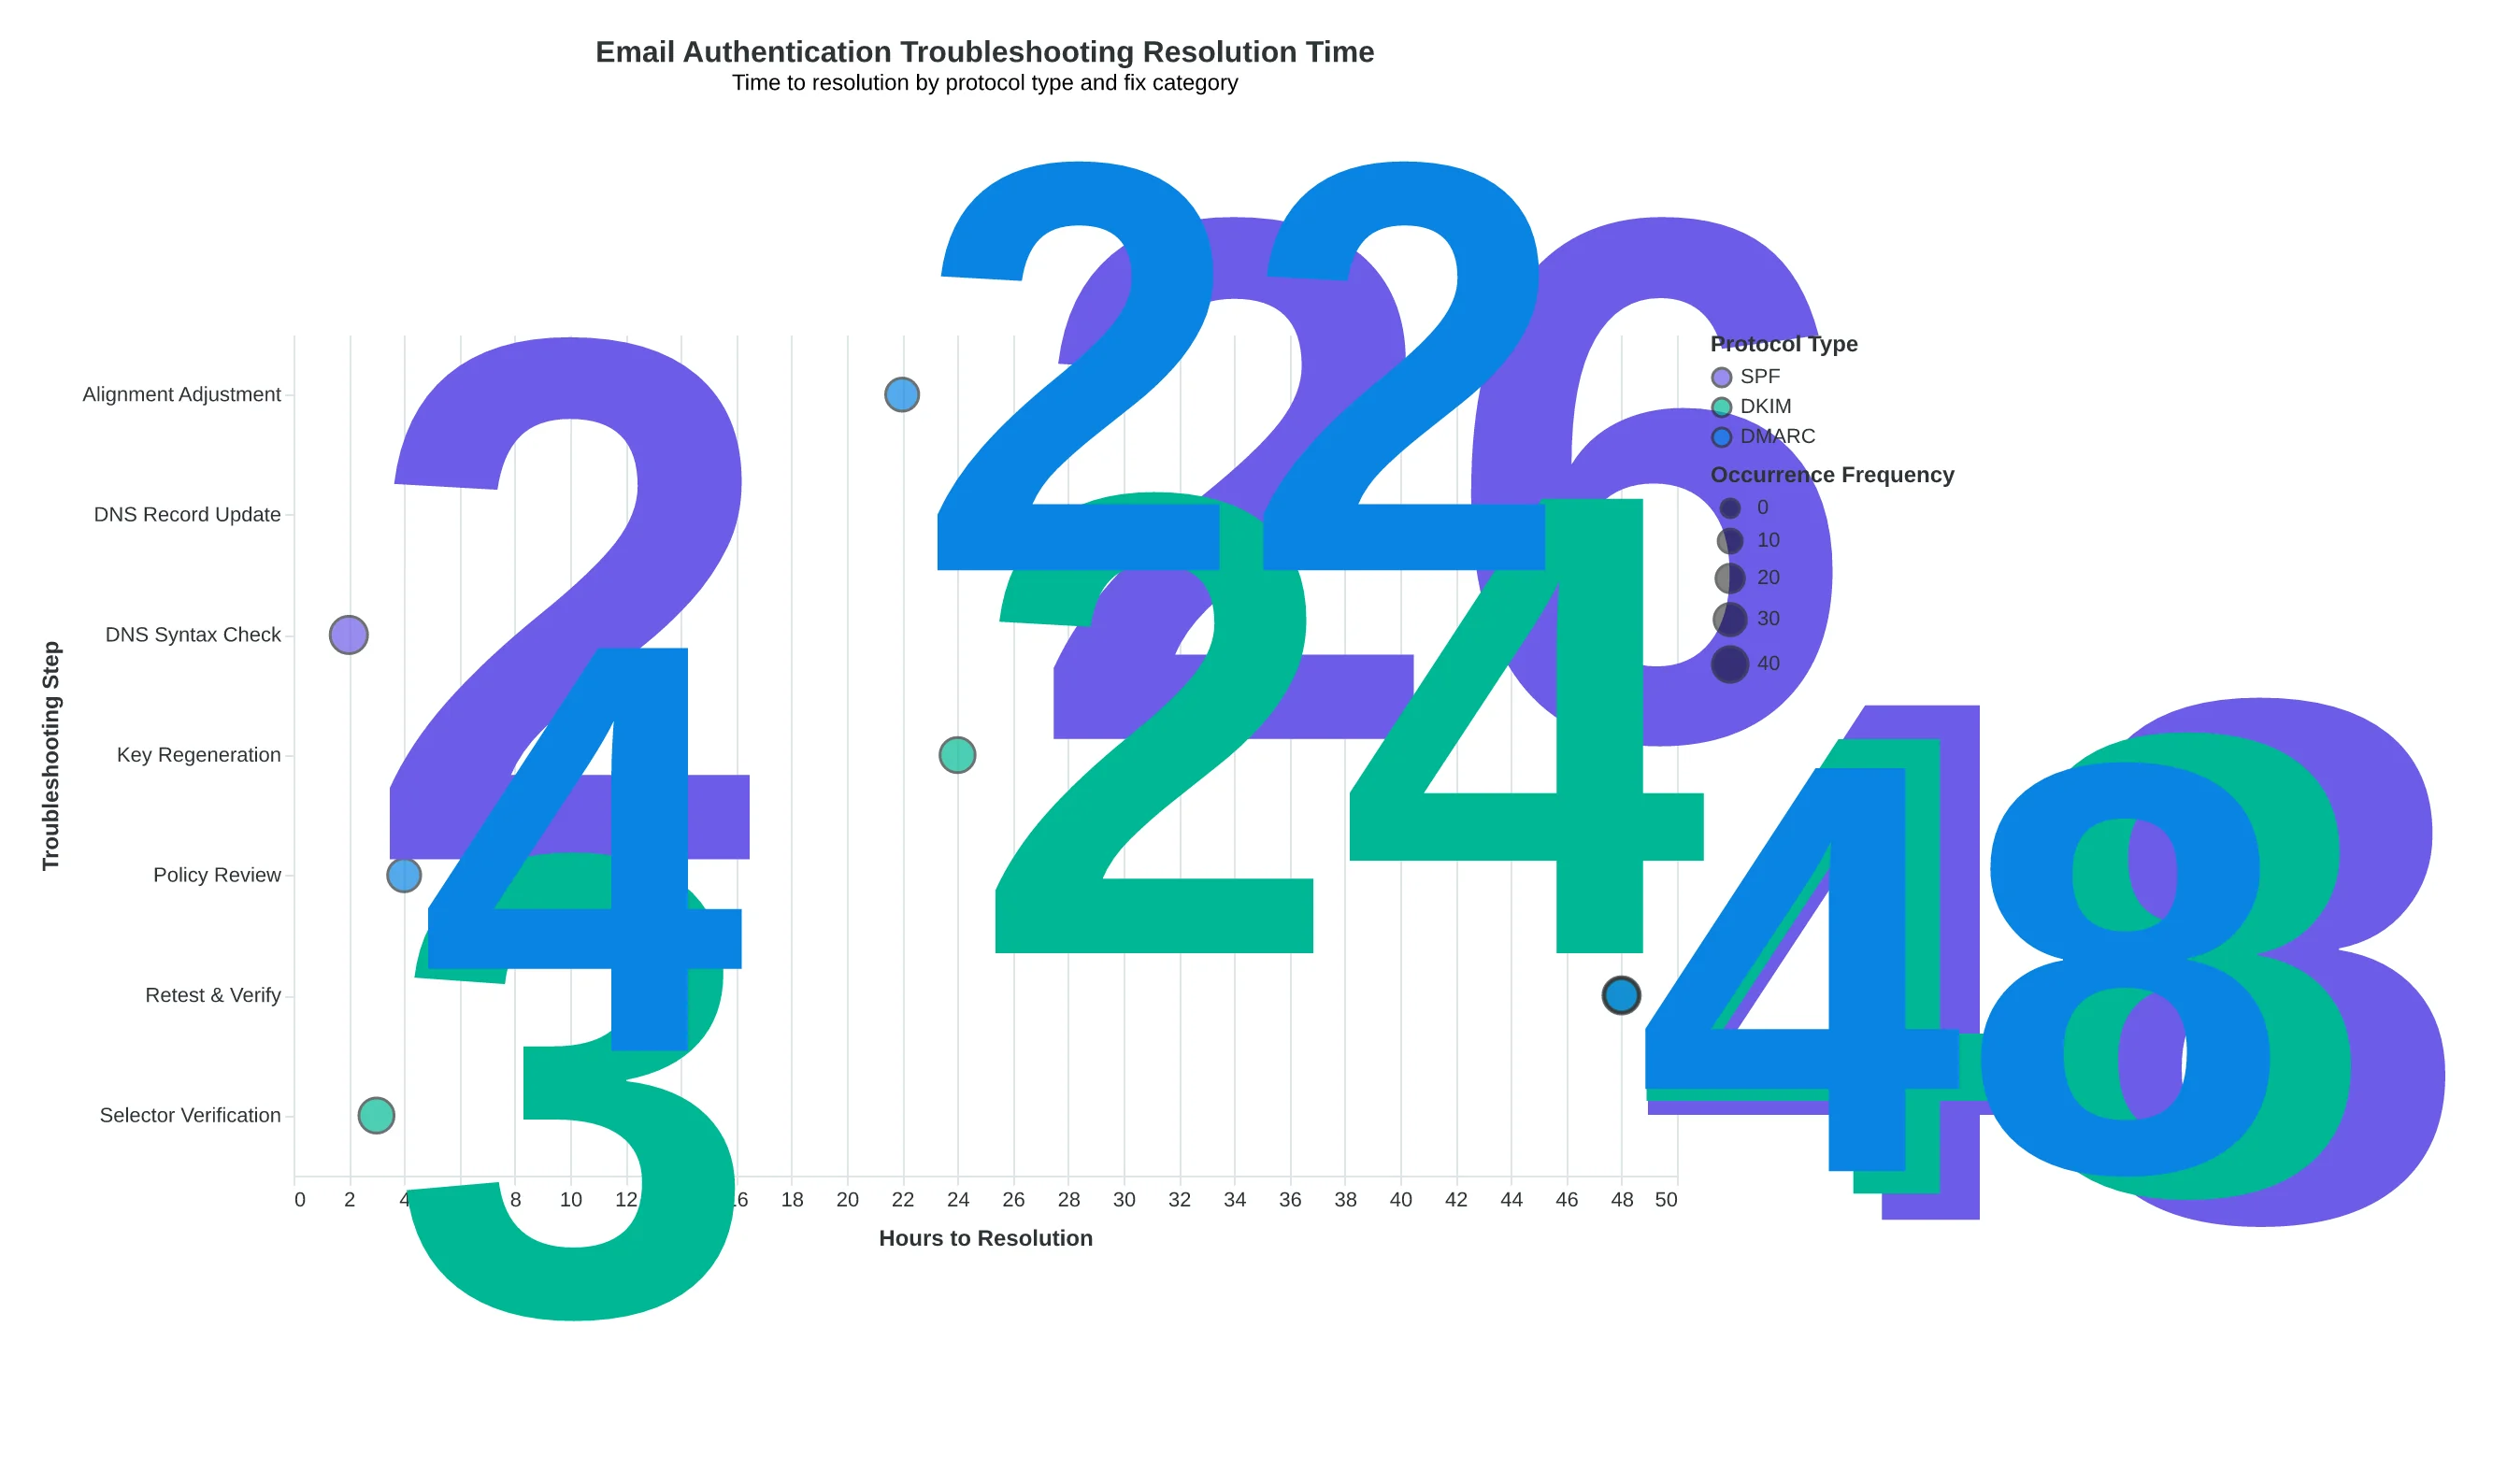
Authentication troubleshooting decision tree for common DNS configuration issues
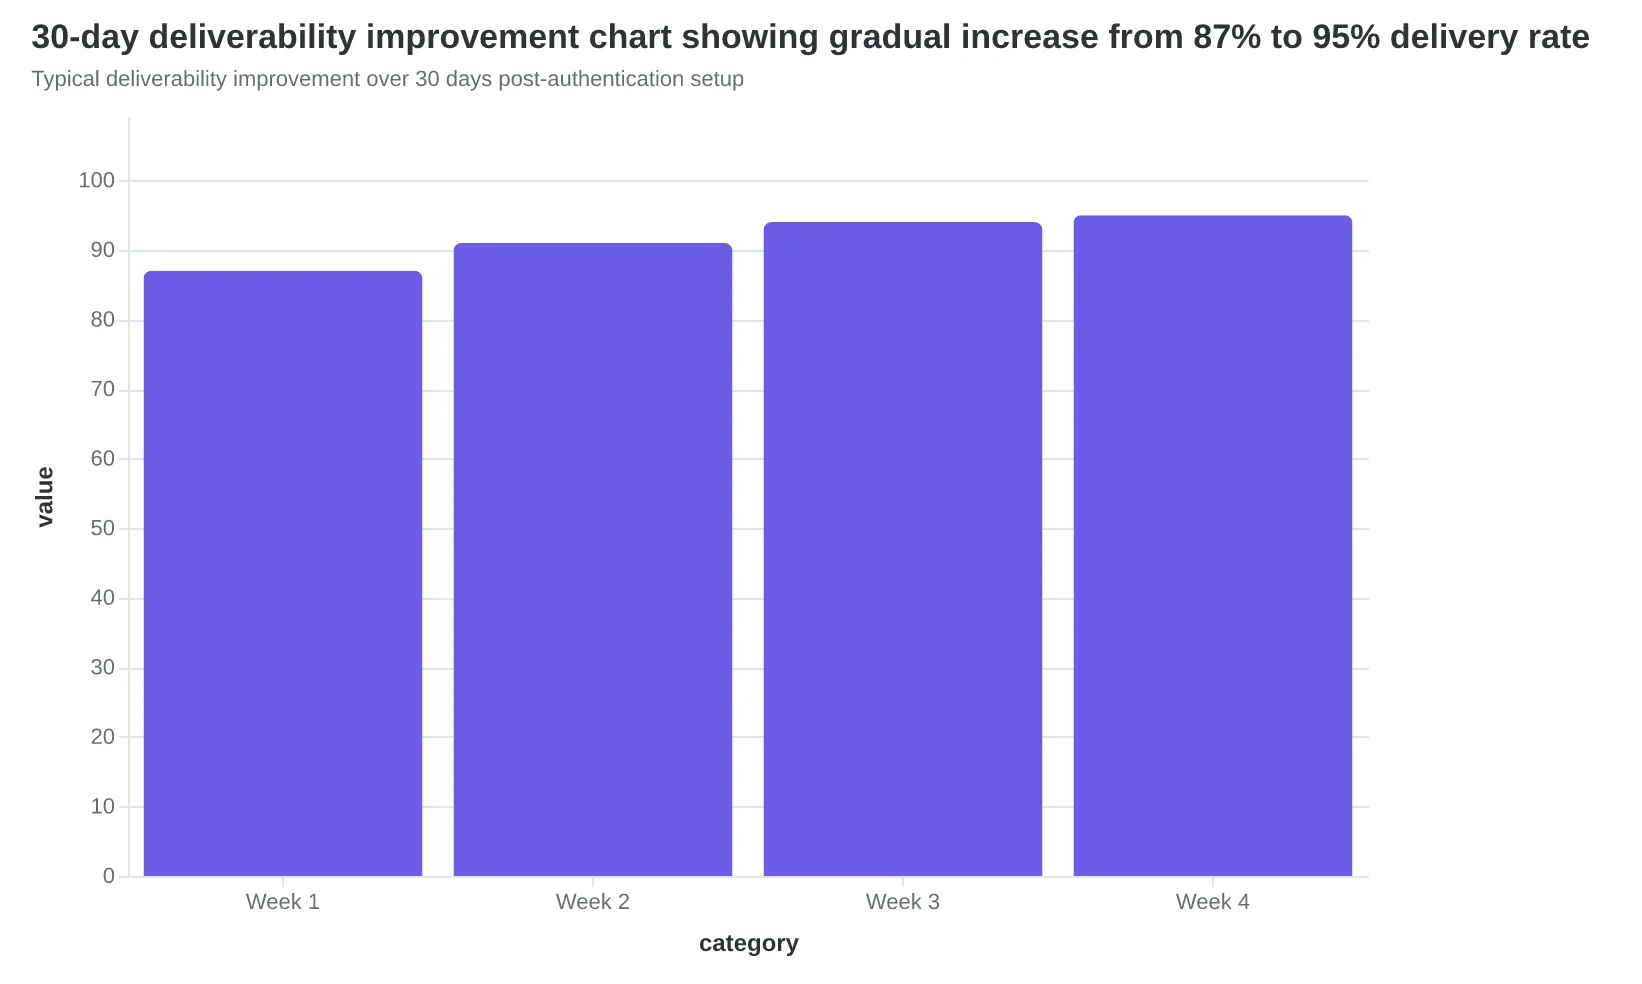
Maria's restaurant emails now reach 95% of her subscribers instead of 83%. That's 12 more customers seeing every promotion, every menu update, every special event announcement. The difference between authenticated and unauthenticated email isn't technical—it's revenue.
Your 30-minute authentication setup protects every email you'll send for years. But don't stop at authentication. The inbox is just the starting line.
Here's your final implementation checklist:
• Verify all three records are active in DNS • Test with authentication-checker.org weekly • Monitor bounce rates and spam folder placement • Track deliverability improvements over 30 days • Score your email content quality beyond just authentication
Authentication gets your emails delivered. Quality gets them opened, clicked, and converted. The 8-Dimension Email Quality Framework measures what happens after the inbox—subject line effectiveness, content relevance, and conversion potential.
Download our Authentication + Quality Monitoring Checklist to track both deliverability and performance improvements over the next 30 days.
You've secured the foundation. Now build something worth delivering on it.
“Authentication gets your emails delivered. Quality gets them opened, clicked, and converted.”
| Authentication Task | Completion Status | Monthly Check |
|---|---|---|
| SPF Record Published | ✓ Complete | Verify syntax |
| DKIM Keys Generated | ✓ Complete | Test signature |
| DMARC Policy Active | ✓ Complete | Review reports |
| DNS Propagation | ✓ Complete | Confirm resolution |
| Authentication Testing | ✓ Complete | Weekly validation |
| Your authentication foundation is complete—maintain it with monthly monitoring | ||
Typical deliverability improvement over 30 days post-authentication setup
Ready to Score Your Own Emails?
Authentication handles delivery—but what about quality? Try our free Email Quality Scoring tool to measure subject line effectiveness, content relevance, and conversion potential.